Playing with the Document Object Model (DOM)
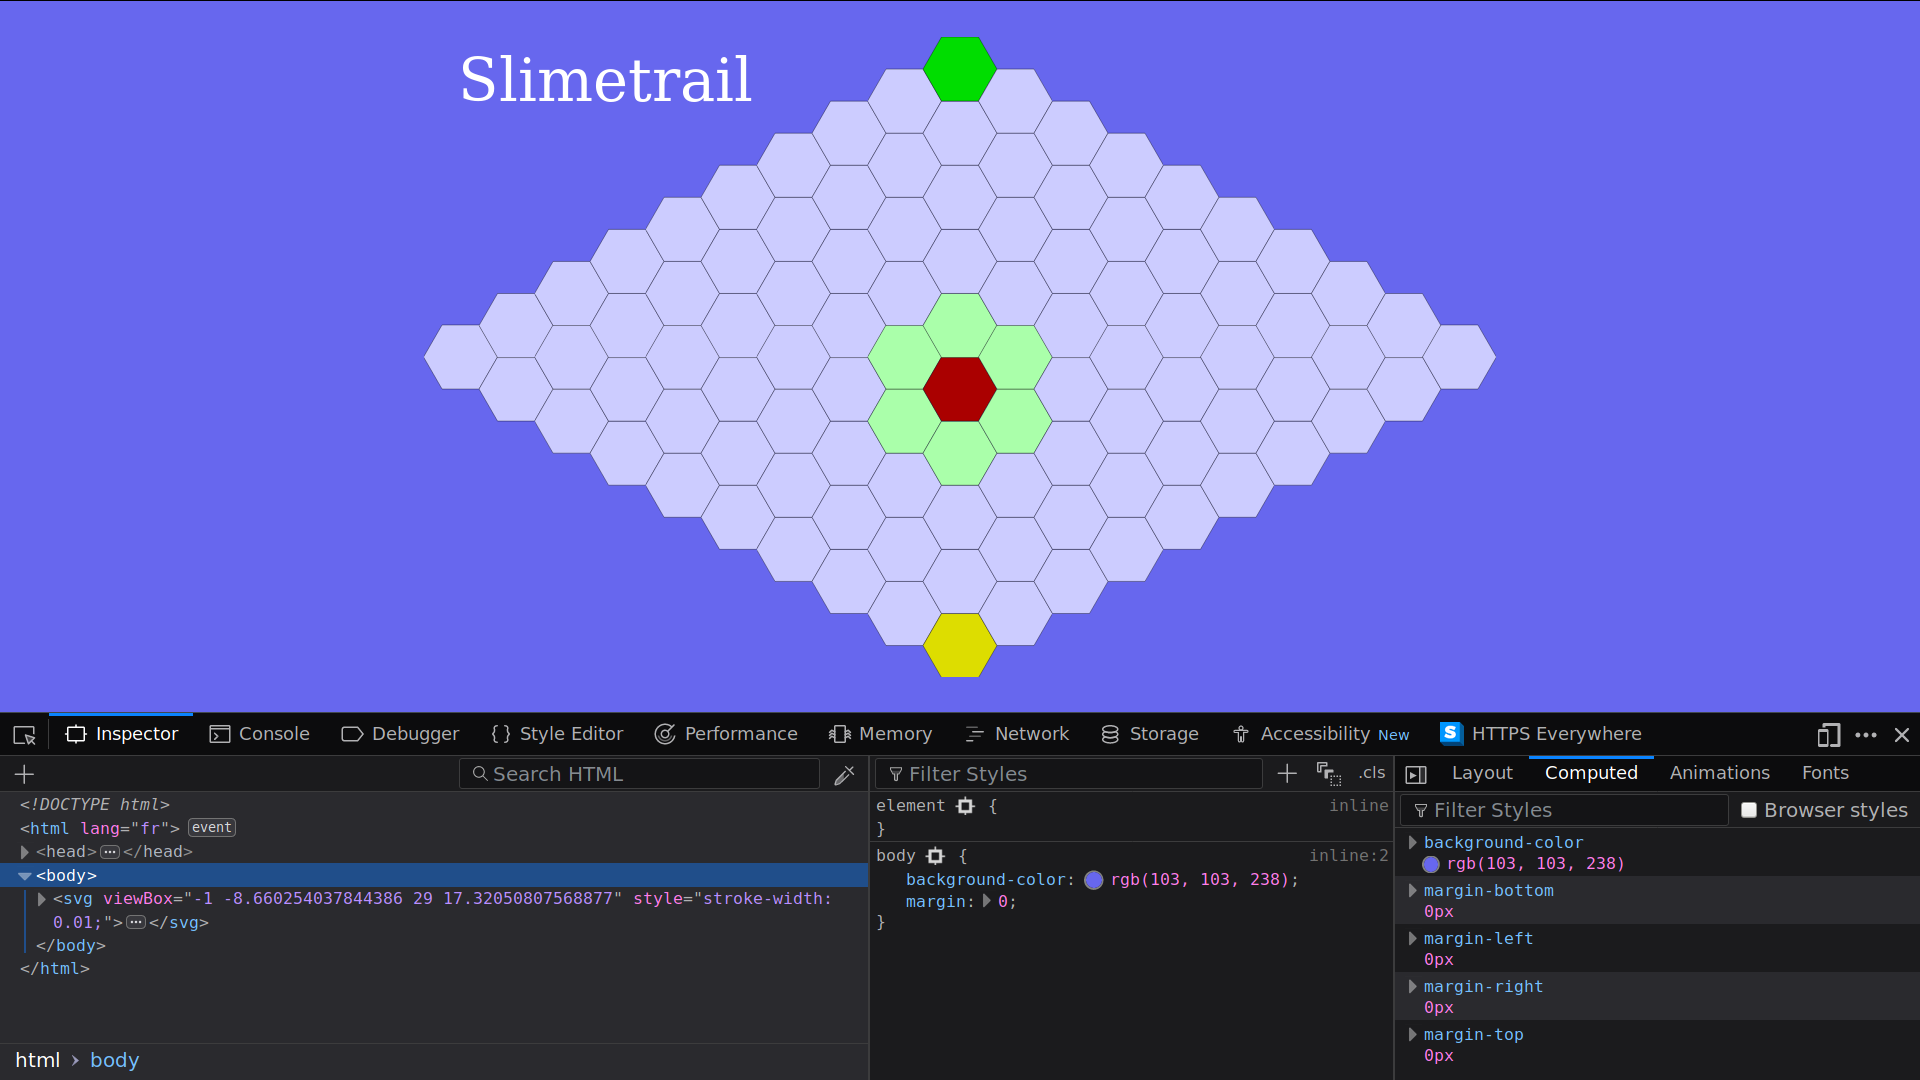
It is time to meet the DOM. First open the page chrilves.github.io/slimetrail on which you played in the last section. Then open the development tools. In Firefox, you can do so by opening the Web Developer -> Toggle Tools menu item. You should see something like this:

The bottom half of the screen is the Web Developer Tools.
The Inspector panel
- Recommended time to spend on this part: 10 minutes
- Recommended finishing before: 9:15am
The inspector shows you the HTLM/CSS/SVG code of the page in real time. JavaScript code can modify the HTLM/CSS/SVG code of the page through an API (Application Programming Interface) known as the Document Object Model or DOM for short.
- Play the game and watch the code of the page being modified as you play.
- Write down 10 modifications of the tree you noticed.
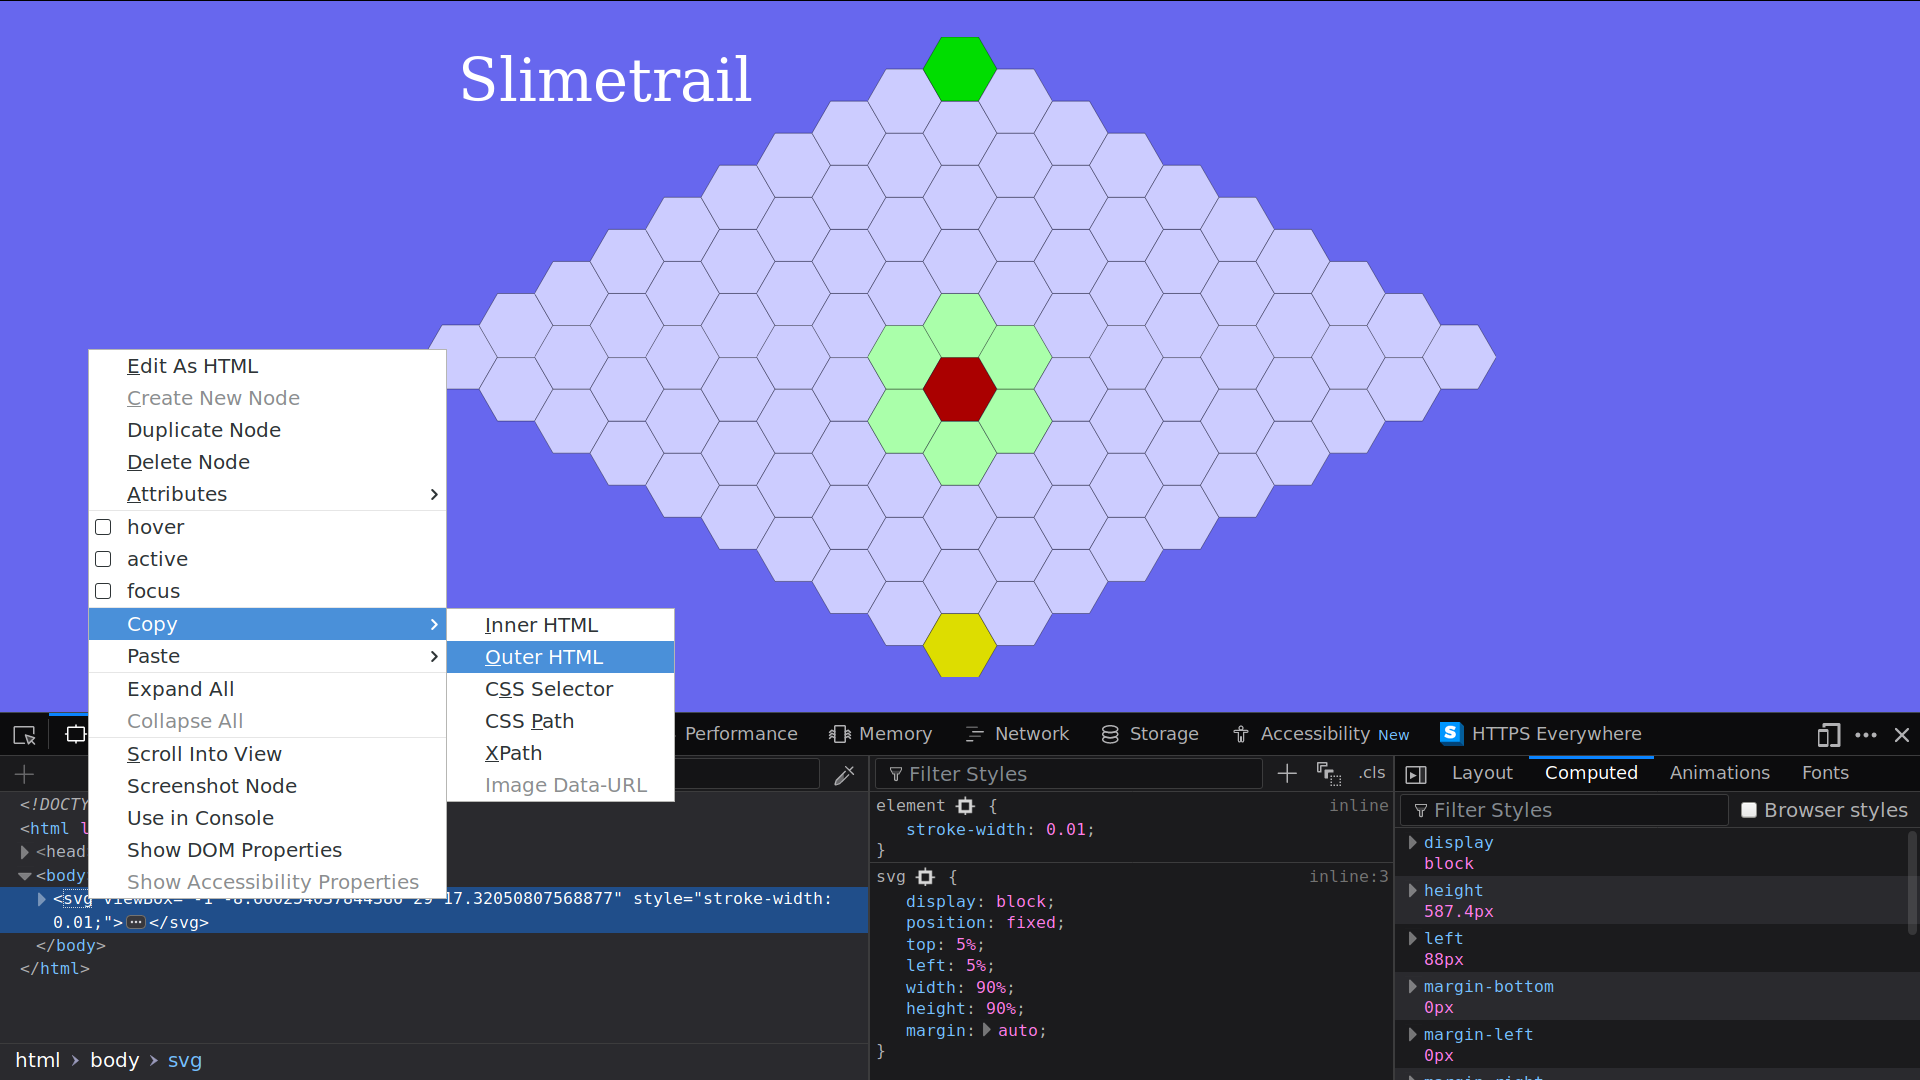
Within the inspector you can explore the structure of the document, but also modify it and even copying it.
- Select the
<svg ...>tag, then right-click and selectCopy -> Outer HTMLlike this:

- Paste it any text editor you like.
During this session, use the inspector often either to inspect a working example like the one at chrilves.github.io/slimetrail, or as a REPL by writing down HTML/CSS/SVG or as a debugger.
The console panel
- Recommended time to spend on this part: 30 minutes
- Recommended finishing before: 9:45am
The console panel is a JavaScript REPL. Enter the following JavaScript code and watch the effects on the page:
let x = "Welcome ";
x;
x = x + "to the console";
console.log(x);
document.body
        .appendChild(document.createTextNode("Hello"));
The structure of the page, exposed in the inspector panel, is (more or less) an XML tree made of Node. There are different kind of nodes such
as Text nodes which are leaves representing some text or Element nodes which represent an HTML or SVG tag such as div, span, body, svg and many others. As you can see in the inspector Element nodes can have sub-nodes that are called children and key/value pairs attached to them called Attributes. We will only use Text and Element nodes in this session.
One of the most important concept is the document, it represents the page. You can access it simply with document. It provides many of the main functions we will use:
-
document.getElementById get an
Elementnode by itsidattribute.Try the following code in the console. Observe the result and find the node in the inspector:
let rules = document.getElementById("rules"); rules; -
document.createTextNode creates a
Textnode but does not attach it to the page yet!Try the following code in the console. Observe the result and try to find it in the inspector:
let mytextnode = document.createTextNode("I am a text node"); mytextnode; -
element.appendChild add a node to the children of the element.
Try the following code in the console. What change do you see on the page? Find the
mytextnodein the inspector:rules.appendChild(mytextnode); -
element.replaceChild replace a node that is a child of the element by another node.
Try this in the console:
let mynewtextnode = document.createTextNode("I am the new text node");
rules.replaceChild(mynewtextnode, mytextnode);
Observe the effect on the page. Using the inspector, notice what happend.
-
document.createElementNS creates a new
Elementnode but does not attach it to the page yet. Note that this function requires an argument called the namespace. A tag may have several meaning depending on the context, how does the browser know how to interpret it? Take aaddresstag for example, is it a postal address? Or an email address maybe? To avoid ambiguity, we can make clear what is the meaning of a tag by defining its namespace. We will use two namespaces in this session:- The HTML namespace tells the browser the node is to be interpreted as an HTML node. Its value is
"http://www.w3.org/1999/xhtml". - The SVG namespace tells the browser the node is to be interpreted as an SVG node. Its value is
"http://www.w3.org/2000/svg".
Using the HTML namespace for a SVG node will result in the browser treating it as an HTML node and thus misbehaving. Be very careful about that, always give the correct namespace.
Try the following code in the console. Add the element to the page and observe the result in the inspector:
let myhtmlelement =
      document.createElementNS("http://www.w3.org/1999/xhtml", "h1");
myhtmlelement;
Try the following code in the console. Add the element to the page and observe the result in the inspector:
let mysvgelement = document.createElementNS("http://www.w3.org/2000/svg", "polygon"); mysvgelement; - The HTML namespace tells the browser the node is to be interpreted as an HTML node. Its value is
-
element.setAttributeNS set an attribute on the
element. Attributes can also have a namespace but unlike elements it is optional.Try the following code in the console. Observe the effects on
myhtmlelementin the inspector.myhtmlelement.setAttributeNS( undefined, "akey", "avalue"); myhtmlelement;myhtmlelement.setAttributeNS( undefined, "akey", "newvalue"); myhtmlelement;myhtmlelement.setAttributeNS( "http://www.w3.org/1999/xlink", "xlink", "anothervalue"); myhtmlelement; -
Node.parentNode returns the parent node if it exists.
Try the following code in the console. Find the parent node in the inspector.
let rulesParent = rules.parentNode; rulesParent; -
Node.addEventListener attach a reaction to an event on this node.
Try the following code in the console. Then click on the page to observe the result.
function reaction1(event) { alert("Event received and reaction triggered!"); } document.body.addEventListener("click", reaction1); -
Event.stopPropagation prevents further propagation of the current event in the capturing and bubbling phases.
function reaction2(event) { event.stopPropagation(); alert("Event received, reaction triggered but no further propagation!"); } document.body.addEventListener("click", reaction2); -
By default, JavaScript code in a page can be executed before the page is fully loaded. Code that need the page to be fully loaded can set themselves as an event listener on
documentfor the DOMContentLoaded event.function reaction3(event) { alert("I will be executed when the page is fully loaded"); } document.addEventListener("DOMContentLoaded", reaction3);
These are the few functions you need to use to create or modify the page structure from JavaScript.
Real-Life Application
- Recommended time to spend on this part: 10 minutes
- Recommended finishing before: 9:55am
It is about time to apply all this knowledge into a real-life example. To do so, create a new file named example.html whose content is:
<!DOCTYPE html>
<html>
  <head>
    <meta charset="UTF-8">
    <script type="text/javascript">
    /* Place here the code that create the svg tree
       and add it to the page so that the image is
       displayed by the browser.
    */
    </script>
  </head>
  <body>
  </body>
</html>
Write within the <script ...> tag above the JavaScript code to create the following complete Element and append it to the <body> node so that the browser displays the image. This example is taken from the book SVG Essentials.
<svg width="140"
     height="170"
     xmlns="http://www.w3.org/2000/svg"
     xmlns:xlink="http://www.w3.org/1999/xlink">

  <title>Cat</title>
  <desc>Stick Figure of a Cat</desc>

  <circle cx="70" cy="95" r="50" style="stroke: black; fill: none;"></circle>
  <circle cx="55" cy="80" r="5" stroke="black" fill="#339933"></circle>
  <circle cx="85" cy="80" r="5" stroke="black" fill="#339933"></circle>

  <g id="whiskers">
    <line x1="75" y1="95" x2="135" y2="85" style="stroke: black;"></line>
    <line x1="75" y1="95" x2="135" y2="105" style="stroke: black;"></line>
  </g>

  <use xlink:href="#whiskers" transform="scale(-1 1) translate(-140 0)"></use>

  <polyline points="108 62, 90 10, 70 45, 50, 10, 32, 62"
            style="stroke: black; fill: none;">
  </polyline>

  <polyline points="35 110, 45 120, 95 120, 105, 110"
            style="stroke: black; fill: none;">
  </polyline>
</svg>
Open the page in the browser, the inspector should be similar to:
<!DOCTYPE html>
<html>
  <head>
    <meta charset="UTF-8">
    <script type="text/javascript">
    /* Your Javascript code to create the following
       svg element should be here
    */
    </script>
  </head>
  <body>
    <svg width="140"
         height="170"
         xmlns="http://www.w3.org/2000/svg"
         xmlns:xlink="http://www.w3.org/1999/xlink">

      <title>Cat</title>
      <desc>Stick Figure of a Cat</desc>

      <circle cx="70" cy="95" r="50" style="stroke: black; fill: none;"></circle>
      <circle cx="55" cy="80" r="5" stroke="black" fill="#339933"></circle>
      <circle cx="85" cy="80" r="5" stroke="black" fill="#339933"></circle>

      <g id="whiskers">
        <line x1="75" y1="95" x2="135" y2="85" style="stroke: black;"></line>
        <line x1="75" y1="95" x2="135" y2="105" style="stroke: black;"></line>
      </g>

      <use xlink:href="#whiskers" transform="scale(-1 1) translate(-140 0)"></use>

      <polyline points="108 62, 90 10, 70 45, 50, 10, 32, 62"
                style="stroke: black; fill: none;">
      </polyline>

      <polyline points="35 110, 45 120, 95 120, 105, 110"
                style="stroke: black; fill: none;">
      </polyline>
    </svg>
  </body>
</html>